How I built an iPhone app with Claude Code and shipped it to the App Store in 2 days

I'd never written a line of code. Two days later my game was live on the App Store.
This is the story of how I built my first iPhone game with no programming knowledge and uploaded it to the App Store.
I'll walk through every step, every mistake, and every discovery that could be useful to anyone who's ever wanted to make their own app but didn't know how. If you finished at least 4th grade, have a computer with internet, and $20 for a Claude subscription, you can repeat this with zero problems. Build your own app. Run ads in it, charge for it, sell premium features. Whatever you want from it.
Building your own app is easier than it looks.
Step 0: The idea
You need to know what you're building before Claude Code is involved. The bar: one mechanic, one sentence to explain it. Spend a few hours just thinking. Use regular Claude in the browser to sharpen the idea before you switch to Claude Code. Refining a concept in chat is cheaper than refining it in code.
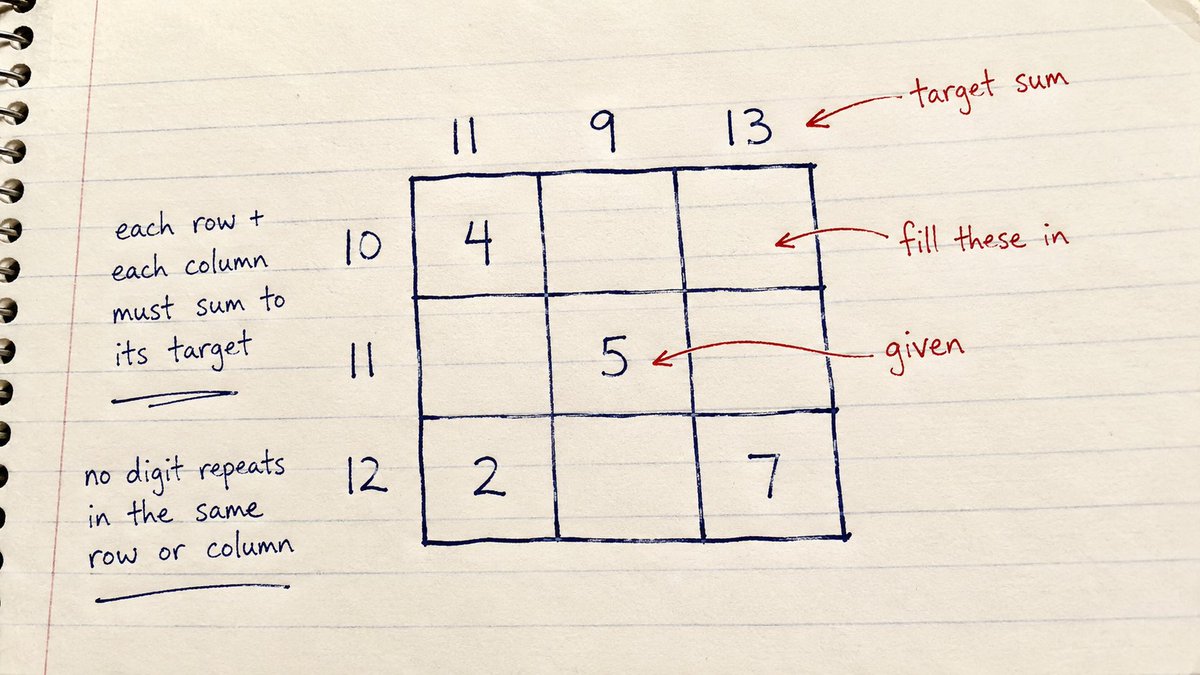
What was my idea. It's a math-based logic puzzle. You get a 3×3, 4×4, or 5×5 grid with some cells already filled and some empty. Above each column and to the left of each row sits a target number. Your job is to fill the empty cells with digits so that every row sums to the number on its left and every column sums to the number on top, with no digit repeating inside the same row or column. Three difficulty levels: easy, medium, hard. That's the whole game.
Step 1: Send the first prompt and get your game on your phone
Install Claude Code from claude.com/claude-code. Open it in an empty folder outside OneDrive / iCloud / Dropbox (cloud-synced folders break the project later).
Send this prompt:
I'm building an iPhone app, and I want it on the App Store. The idea: [your one-sentence idea here]. I've never built a mobile app and I've never used Claude Code before. I'll be working from Windows, with React Native. Please create all the files and folders I'll need for this.
Three things this prompt needs:
End goal (App Store, not just "an app")
Your skill level
Your OS
Claude will pop up 3–4 quick questions (app name, TypeScript or JS, folder location, is Node installed). Answer them. After that you don't type anything for the next ~15 minutes. Just watch.
While you wait, install Expo Go on your iPhone from the App Store. Free app.
When Claude says it's done, open a terminal in the project folder:
A QR code prints in the terminal. Open the iPhone camera (not Expo Go), point at the QR, tap the banner. Your game launches.
One prompt doesn't give you a one-screen prototype. Mine came out as a full skeleton:
Three board sizes, three difficulties, working logic, on a real phone. From here, the whole remaining job is iteration.
This is what the first version of my app looked like:

In 15 minutes I had a working program. All that was left was polish and publishing.
Step 2: Polish — design, sound, animations
The game worked. Now I wanted to make it actually look and feel right.
Design
I used readdy, an AI tool that generates app designs. The move that made it work in one shot: I didn't write the design prompt myself. I asked Claude Code to write the readdy prompt for me, gave it a quick brief (colors, icons, style I wanted), and Claude produced a detailed design prompt. I pasted that into readdy. Eight minutes later I had a full design for every screen of the app. One prompt, zero edits.
The official path is to export the design from Readdy to Figma, then port it into the project. But Readdy and Figma needs a paid subscription, and I didn't want to pay just for the handoff. My workaround: I screenshotted every screen out of readdy, dropped the screenshots into a new folder inside the project, and told Claude Code:
The design I want is in this folder. Match it in our app.
Five minutes later the app looked exactly the way I wanted.
Sound
Same pattern. I asked Claude Code which sounds the app needed. It told me to grab them from mixkit (free, no account needed) and drop them in a folder inside the project. Claude wired them in itself: which event triggers which sound, volume, timing.
Splash screen, animations, and everything else
I didn't write specs for any of these. Claude did them on its own initiative and they came out clean on the first try. Same for things I didn't even know I wanted: stats screen, timer, dark theme, multiple languages. After each of my messages Claude would propose another thing it could add. I just said yes.
The interesting part is that most of the polish I'm proud of wasn't on my original list.
Step 3: Build the things Apple requires before they'll even look at your app
Apple won't approve a stripped-down app. There's a baseline every iPhone app needs to have or it gets bounced. Most of this Claude built in one or two prompts, but you have to know it's required so you can ask.
Privacy policy and contact info (mandatory, even if you collect zero data)
You need a hosted URL with a privacy policy and a way to contact you. I used netlify, registered for free in 2 minutes. Claude wrote the privacy policy text and a contact page, then deployed both to netlify. I had two live URLs to paste into App Store Connect later.
Don't skip this even if your app has no analytics, no login, no anything. No privacy policy URL = automatic rejection.
Onboarding tutorial on first launch
Apple wants the user to understand what your app does on first open. Two or three screens walking through the basics is enough. I asked Claude to add one for the game.
Settings screen
Every app needs a settings screen even if there's almost nothing to set. Mine has sound on/off, vibrations, language, theme, and a link to the privacy policy.
Loading screen

You can't show a blank screen on app boot. Apple flags it. Claude added a clean loading state.
If any of these is missing, the review will bounce back and you'll lose a day. Get all of them sorted before you hit Submit.
Step 4: Sign up for the Apple Developer Program
This is the annoying part. To publish anything on the App Store you need an Apple Developer account. $99 a year, non-negotiable. No free tier.
Step by step:
Go to developer.apple.com/programs and click Enroll.
Sign in with the same Apple ID you use on your iPhone (makes testing later easier). Two-factor auth is required.
Choose Individual, not Organization. Organization requires a DUNS number and can take weeks. Individual is the fast lane.
Fill in your real legal name and address. Whatever you type here is what appears as the developer name on your App Store listing, so use the name you want shown.
Submit. Now you wait. Apple verifies your identity before they'll even let you pay. For me this took ~3 hours. Some people wait a day. You'll get an email when you can continue.
After approval, log back in, finish enrollment, and pay the $99.
Within a few minutes the account is active and you can start creating app records in App Store Connect.
The hardest part is the wait in step 5.
Step 5: Create your App Store Connect listing
This is the storefront page for your app. If any required field is empty, Apple won't even start reviewing.
Go to appstoreconnect.apple.com, sign in with the Developer account from Step 4. Click My Apps → + → New App.
What you fill in:
- Create the app record
Platform: iOS
App name (the title on the store)
Primary language
Bundle ID: must match exactly the bundleIdentifier from your app.json. If they don't match, nothing else will work.
SKU (any unique string, e.g. sumsudoku001)

- App Information
Subtitle (30 chars, shown under the title)
Privacy Policy URL (the netlify URL from Step 3)
Category (primary + optional secondary)
- Age Rating questionnaire
A short multiple-choice form about violence, sexual content, gambling, etc. Answer honestly. Wrong answers here are a common rejection reason.
- Pricing and Availability
Free or paid
Countries where the app will be available
- Version Information (the actual store page)
Promotional text (170 chars, editable anytime after launch)
Description (4000 chars, the body of the page)
Keywords (100 chars, comma-separated; these drive your search ranking, pick carefully)
Support URL (your netlify contact page from Step 3)
Screenshots in every device size Apple currently requires (the 6.9" iPhone is mandatory in 2026)
App Review Information (your contact info; demo account if your app has a login)
- App Privacy
A separate section where you declare what data the app collects. If you collect nothing (my case), tick "Data Not Collected" and move on.
Don't press Submit yet. The Build slot is still empty. Step 6 fills it.
Step 6: Run the production build through EAS
This is where you generate the actual file that gets uploaded to Apple. EAS (Expo's build service) does it on their cloud servers. You don't compile anything locally.
Your only setup task: register a free Expo account at expo.dev.
Then in your project terminal:


Sign in with your Expo credentials. After that, hand it back to Claude:
Run the production iOS build through EAS and submit to App Store Connect.
Claude does the rest itself. It'll prompt you a few times (your Apple ID and password for certificate generation, plus a question about letting EAS manage credentials). Say yes to both, approve the prompts, and stay near the terminal.
Build runs on EAS servers and takes 15–35 minutes. When it finishes, EAS uploads the build straight into App Store Connect. Refresh your listing page from Step 5 and your new build will appear in the Build slot, ready to attach to the version.
Step 7: Submit for Review and answer Apple's follow-up questions
Two actions on your end. Then you wait.
Submit the build
In App Store Connect, open the version you set up in Step 5. The build from Step 6 should now show up in the Build slot.
Click + Add Build and pick your EAS build
Run through every section one more time. If any field is red or flagged, fix it now.
Choose your Version Release option (Automatic on approval, or manual. Automatic means your app goes live the second Apple approves it. Manual means after approval you have to come back and press Release Now yourself. I picked Manual)
Click Submit for Review
Status changes to Waiting for Review, then to In Review.
Then Apple emails you with questions
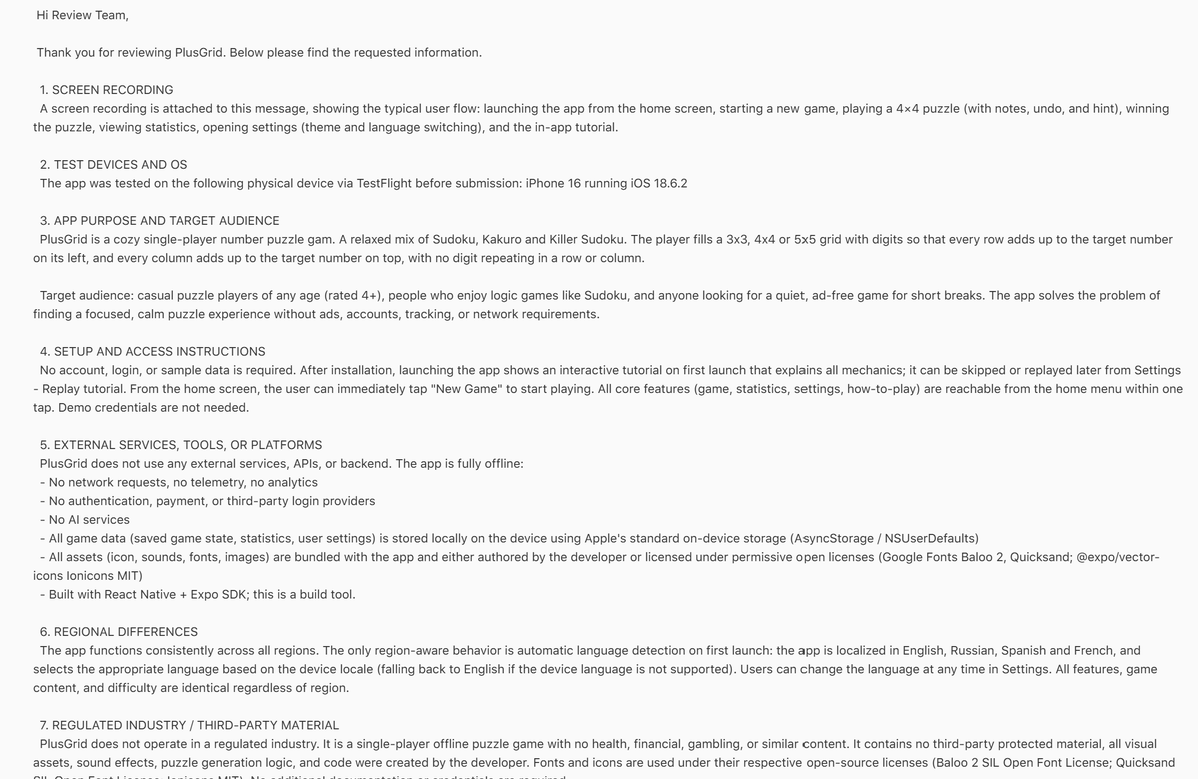
My first review didn't end with approval or rejection. It ended with an email titled something like "We need more information from you," asking for a screen recording of the app and answers to 7 specific questions.
Don't panic when this happens. Many first-time submissions, especially from new developer accounts, get this email. It's not a rejection. It's Apple asking for clarification before deciding. You reply once inside App Store Connect's Resolution Center.
Apple's seven standard questions and how I answered each:
Screen recording. A 30–60 second clip of the typical user flow: open the app, use the main features, close. Record from your iPhone screen, attach mp4, mov or heic.
Test devices and OS. Which physical iPhone and which iOS version you tested on via TestFlight before submitting.
App purpose and target audience. One sentence on what the app does and who it's for.
Setup and access instructions. What the reviewer has to do to test the app (in my case: nothing, no login required).
External services, tools, or platforms. Any third-party APIs, backends, or services the app uses. If none, say so explicitly. (React Native and Expo are build tools, not external services — note that explicitly so they don't ask follow-ups.)
Regional differences. Does the app behave differently in different countries? If yes, explain how.


Regulated industry / third-party material. Does the app fall under a regulated category (finance, health, gambling, alcohol)? Does it use any copyrighted material? For a simple game with none of the above: no to both.
The format that worked: short polite greeting, numbered answers matching Apple's numbered questions, no extra fluff. Reviewers go through dozens of these a day. Make their job easy.
After you send the response, press Submit for Review again. The reply alone doesn't push you back into the queue. Once you re-submit, status flips back to In Review. Then you wait again.
Step 8: Apple approves your app. You ship.
After Apple finishes the re-review, the email lands in your inbox: "Your app has been approved for the App Store."
Go back into App Store Connect and open your app's version. Because you chose Manual release in Step 7, the status now shows Pending Developer Release with a Release This Version (or Distribute) button. Click it.
Apple starts pushing your app through their CDN. The listing doesn't go live instantly. Give it about an hour. After that, open the App Store on your iPhone, search for your app name, and there it is.
You can download your own app, the same one anyone else with an iPhone can now download.
That's the moment the experiment ends.
One catch about the EU. Your app won't be available in EU countries by default. To enable it, complete the DSA Trader Status setup in App Store Connect (free, but you have to provide a verified physical address, phone, and email, all of which become publicly visible on your App Store listing)
What it cost, what it earned, what it means
The full bill to ship an original iPhone game to the App Store:
Apple Developer Program: $99/year
Claude subscription: $20/month
Everything else: free (Expo, EAS, readdy for design, mixkit for sounds, netlify for the privacy policy)
Time: 2 days of building, then about a day or two of waiting on Apple
Roughly $119 and 2 days of focused work to get a real, original product on a real platform that anyone with an iPhone can install.
A year ago, getting to this same outcome would have meant either three months of learning React Native myself or paying a freelancer a few thousand dollars. Now it takes a weekend and the cost of a couple of dinners.
The skill that matters here isn't "can you write code." It's "can you describe what you want, in the right order, with the right priorities." That's the whole game now. Everything else is execution Claude handles.
If you've ever had an app idea and shelved it because you don't code, this is your sign. The blocker isn't there anymore. Go build the thing.
If this was useful, head over to my profile and hit follow. I write about AI and other experiments worth running.
Onwards,
- Yarchi (@undefinedKi)
Prompts
src/
├── types.ts
├── theme.ts
├── game/
│   ├── generator.ts          # puzzle generator, 3 sizes × 3 difficulties
│   └── validator.ts          # row/column sum checker
├── components/
│   ├── Cell.tsx
│   ├── Board.tsx
│   └── NumberPad.tsx
└── screens/
    ├── HomeScreen.tsx
    └── GameScreen.tsx
App.tsx
app.json
eas.json
eas loginnpm startLinks
Related articles

How I'd make $10 million with AI agents
Two markets worth trillions are opening at the same time. I've been through 3 platform shifts living in Silicon Valley building/selling VC-backed companies and I've NEVER seen this.

This Fake Wedding Video Is Getting 12M+ Views. Here's How To Make One For Your App.
A wedding video is getting millions of views right now, and none of it is real. The cliffside venue? Fake. The guests? Fake. Even the bride is an AI character generated from scratch.

These 10 Skills Turn Claude Code Into an ENTIRE Team.
Most people are still running Claude Code raw. Every session starts from zero, they re-explain the project for the fifth time this month, and they get code that looks fine until it breaks.